This guide will walk you through setting up and configuring the Brand List page, which displays all your brands in a searchable, alphabetical format.
Accessing the Brand List Settings
- Log into your Shopify admin dashboard
- Go to “Online Store” → “Themes” in the left sidebar
- Click “Customize” on your active theme
- In the theme editor, navigate to the page where you want to add the Brand List
- In the left sidebar, look for the “Template” section
- Expand the “Apps” category under Template
- You should see “Brand Page – Our Brands” or similar
- Click on it to select the Brand List block
Understanding the Brand List Block
The Brand List block displays all your active brands in an organized, searchable format. It includes features like:
- Alphabetical organization
- Search functionality
- Brand logos and descriptions
- Letter section headers
- Empty state messaging
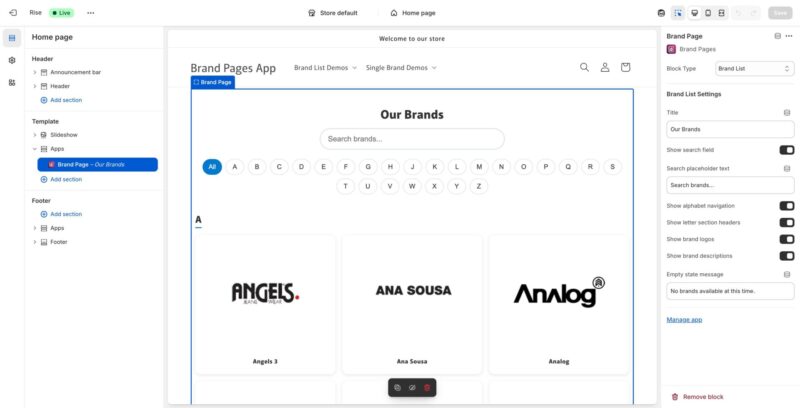
Configuring Brand List Settings
In the right sidebar, you’ll see the “Brand List Settings” panel with various configuration options:
Title
- Locate the “Title” field in the Brand List Settings
- Enter the heading you want to display at the top of your brand list
- Default value is typically “Our Brands”
- You can customize this to match your store’s branding (e.g., “Shop by Brand”, “Our Partners”, etc.)
- The title will appear prominently at the top of the brand list page
Show Search Field
- Find the “Show search field” toggle switch
- Toggle it ON to display a search bar on the brand list page
- Toggle it OFF to hide the search functionality
- When enabled, customers can search for brands by typing in the search field
- This is useful if you have many brands
Search Placeholder Text
- If “Show search field” is enabled, you’ll see the “Search placeholder text” field
- Enter the placeholder text that appears in the search bar before users start typing
- Default value is typically “Search brands…”
- You can customize this to match your tone (e.g., “Find a brand”, “Search our brands”, etc.)
- This text appears in light gray and disappears when users click in the search field
Show Alphabet Navigation
- Find the “Show alphabet navigation” toggle switch
- Toggle it ON to display an alphabetical navigation bar (A-Z)
- Toggle it OFF to hide the alphabet navigation
- When enabled, customers can click on letters to jump to brands starting with that letter
- This is helpful for quickly navigating through many brands
- The navigation typically appears below the search field and title
Show Letter Section Headers
- Find the “Show letter section headers” toggle switch
- Toggle it ON to display large letter headers (A, B, C, etc.) before each alphabetical section
- Toggle it OFF to hide these section headers
- When enabled, brands are grouped by their starting letter with a large letter header
- This makes it easier to see which section you’re viewing
- Works best when combined with alphabet navigation
Show Brand Logos
- Find the “Show brand logos” toggle switch
- Toggle it ON to display brand logos on the brand list
- Toggle it OFF to show only brand names (text only)
- When enabled, each brand card will display the brand’s logo image
- This creates a more visual and engaging brand list
- Make sure your brands have logos uploaded for best results
Show Brand Descriptions
- Find the “Show brand descriptions” toggle switch
- Toggle it ON to display short descriptions under each brand name
- Toggle it OFF to show only brand names
- When enabled, the short description (tagline) you entered for each brand will appear
- This provides more context about each brand
- Descriptions help customers understand what each brand offers
Empty State Message
- Find the “Empty state message” field
- Enter the message you want to display when there are no brands to show
- Default value is typically “No brands available at this time.”
- This message appears when:
- No brands have been created yet
- All brands are set to inactive status
- A search returns no results
- You can customize this to match your brand voice
Previewing Your Brand List
- As you make changes to the settings, the central preview area will update in real-time
- You can see how your brand list will look to customers
- The preview shows:
- The title at the top
- Search field (if enabled)
- Alphabet navigation (if enabled)
- Brand cards with logos and descriptions (based on your settings)
- Letter section headers (if enabled)
- Use the preview to test different configurations
Brand List Layout Options
Full Featured Brand List
For the most comprehensive brand list experience, enable:
- Show search field: ON
- Show alphabet navigation: ON
- Show letter section headers: ON
- Show brand logos: ON
- Show brand descriptions: ON
This creates a rich, searchable, visually appealing brand directory.
Minimal Brand List
For a simple, clean brand list, you can disable most features:
- Show search field: OFF
- Show alphabet navigation: OFF
- Show letter section headers: OFF
- Show brand logos: ON (recommended for visual appeal)
- Show brand descriptions: OFF
This creates a simple grid of brand names/logos.
Saving Your Configuration
- After configuring all your Brand List settings, review them in the preview
- Make any final adjustments
- Click the “Save” button in the top right corner of the theme editor
- Your brand list configuration will be saved and published
- Customers will now see your configured brand list on the live site
Removing the Brand List Block
- If you need to remove the Brand List block from a page:
- Select the “Brand Page – Our Brands” block in the left sidebar
- Scroll to the bottom of the right sidebar settings panel
- Click the “Remove block” button
- Confirm the removal
- The brand list will be removed from that page
Managing Brands from the App
- To add or edit brands that appear in the list, use the “Manage app” link in the settings panel
- This takes you to the Brand Pages app where you can:
- Create new brands
- Edit existing brands
- Set brand status (Active/Inactive)
- Upload brand logos
- Add brand descriptions
- Only brands with “Active” status will appear in the brand list
Best Practices
- Use a clear, descriptive title that matches your store’s voice
- Enable search if you have more than 10-15 brands
- Enable alphabet navigation for 20+ brands
- Always upload brand logos for visual appeal
- Write compelling short descriptions for each brand
- Test the brand list on mobile devices to ensure it looks good
- Keep inactive brands hidden by setting their status to “Inactive”
Troubleshooting
No Brands Appearing
- Check that you have created at least one brand in the Brand Pages app
- Verify that brands are set to “Active” status
- Ensure the Brand List block is properly added to your page
Search Not Working
- Verify “Show search field” is toggled ON
- Check that you have active brands to search through
- Try refreshing the page
Logos Not Displaying
- Ensure “Show brand logos” is toggled ON
- Verify that brands have logos uploaded in the Brand Pages app
- Check that logo file formats are supported (SVG, PNG, JPG)