This guide will walk you through using the Layout Builder to customize the layout and content of your brand pages.
Accessing the Layout Builder
- Log into your Shopify admin dashboard
- In the left sidebar, locate the “Brand Pages” section
- Click on “Brand Pages” to expand the section
- Click on “Layout Builder” – this is Step 1 of the customization process
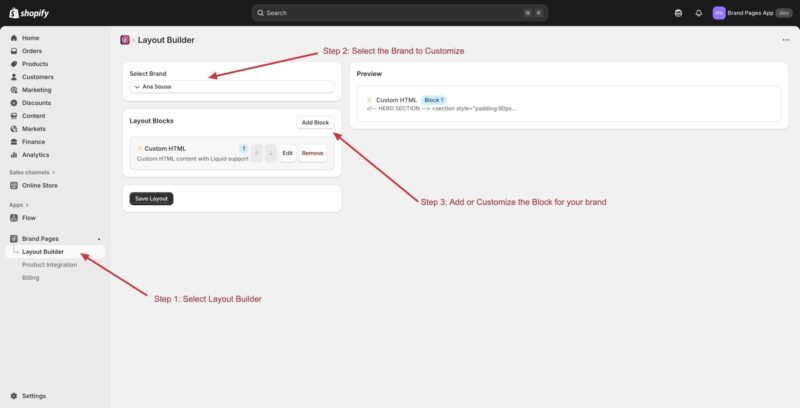
Step 2: Select the Brand to Customize
- Once in the Layout Builder, you’ll see a “Select Brand” dropdown at the top
- Click on the dropdown to see a list of all your brands
- Select the brand you want to customize from the list
- The selected brand name will appear in the dropdown (e.g., “Ana Sousa”)
Step 3: Add or Customize Blocks for Your Brand
Viewing Existing Layout Blocks
- Below the brand selector, you’ll see a “Layout Blocks” section
- This section displays all the content blocks currently configured for the selected brand
- Each block shows:
- An icon indicating the block type
- The block name (e.g., “Custom HTML”)
- A badge showing the block number
- A description of what the block does
- Up/down arrow icons for reordering
- An “Edit” button
- A “Remove” button
Adding a New Block
- Click the “Add Block” button next to the “Layout Blocks” heading
- A menu will appear showing available block types
- Select the type of block you want to add, such as:
- Custom HTML – For custom HTML content with Liquid support
- Header Block – Brand logo and name display
- Hero Block – Large hero image or slideshow
- CTA Banner – Call-to-action section
- Product Showcase – Display featured products
- Category Grid – Display product categories
- Social Links – Social media profile links
- The new block will be added to your layout blocks list
Editing a Block
- Find the block you want to edit in the Layout Blocks list
- Click the “Edit” button on the right side of that block
- A configuration panel will open where you can customize the block settings
- Make your changes to the block configuration
- Save your changes
Reordering Blocks
- To change the order of blocks on your brand page, use the up and down arrow icons
- Click the up arrow to move a block higher in the list (it will appear earlier on the page)
- Click the down arrow to move a block lower in the list (it will appear later on the page)
- The order in the list determines the order they appear on the brand page
Removing a Block
- Find the block you want to remove in the Layout Blocks list
- Click the “Remove” button on the right side of that block
- Confirm the removal when prompted
- The block will be removed from your layout
Example: Custom HTML Block
- If you add a “Custom HTML” block, you can enter custom HTML code
- This block supports Liquid template language for dynamic content
- You can create custom sections like hero sections, banners, or any custom layout
- Example HTML might include:
- Hero sections with custom styling
- Embedded videos or forms
- Custom call-to-action sections
- Any other custom content you need
Previewing Your Layout
- On the right side of the Layout Builder, you’ll see a “Preview” section
- This shows a live preview of how your brand page will look
- The preview updates as you make changes to your blocks
- You can see how each block will render on the actual brand page
- For example, a Custom HTML block will show the rendered HTML in the preview
Saving Your Layout
- After making all your changes, scroll down to find the “Save Layout” button
- Click “Save Layout” to save all your customizations
- Your changes will be applied to the brand page
- You can always come back and edit the layout later
Tips for Customizing Layouts
- Start with a header block to establish your brand identity
- Use hero blocks for eye-catching visuals at the top of your page
- Add product showcase blocks to highlight featured products
- Use CTA banners to guide visitors to take specific actions
- Custom HTML blocks give you maximum flexibility for unique designs
- Preview your changes frequently to see how they look
- Test your layout on different screen sizes if possible
Switching Between Brands
- To customize a different brand, simply select a different brand from the “Select Brand” dropdown
- Each brand can have its own unique layout and block configuration
- Your changes are saved per brand, so you can customize each one independently