This guide will walk you through setting up and configuring individual brand pages that display detailed information about a specific brand, including its products and custom content.
Understanding Single Brand Pages
A Single Brand Page displays:
- Brand logo and name
- Brand description and details
- Products associated with that brand
- Custom content blocks (configured via Layout Builder)
- Brand-specific imagery and messaging
Accessing Single Brand Page Settings
- Log into your Shopify admin dashboard
- Go to “Online Store” → “Themes” in the left sidebar
- Click “Customize” on your active theme
- In the theme editor, navigate to the page or template where you want to add the Single Brand Page
- In the left sidebar, look for the “Template” section
- Expand the “Apps” category under Template
- Look for “Brand Page” or “Brand Page Template” block
- Click on it to select the Single Brand Page block
Configuring the Brand Page Template
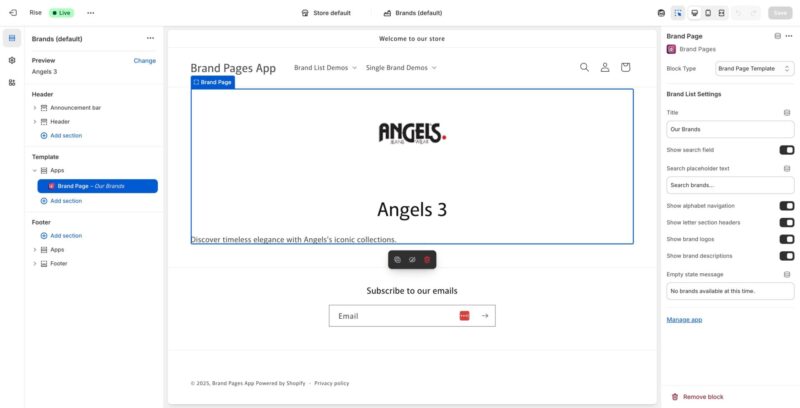
In the right sidebar, you’ll see the “Brand Page” settings panel. The “Block Type” should be set to “Brand Page Template” via a dropdown.
Block Type Selection
- Locate the “Block Type” dropdown in the settings panel
- Ensure it’s set to “Brand Page Template”
- This determines that this block will display a single brand’s page
- If you need to switch between different block types, use this dropdown
Understanding the Brand Page Preview
The central preview area shows how your single brand page will appear to customers. It typically displays:
- Brand logo at the top
- Brand name prominently displayed
- Brand description text
- Any custom content blocks you’ve configured
- Product showcases (if configured)

Customizing Brand Page Content
Using the Layout Builder
The content displayed on single brand pages is primarily controlled through the Layout Builder in the Brand Pages app. To customize what appears on brand pages:
- Go to the Brand Pages app in your Shopify admin
- Click on “Layout Builder”
- Select the brand you want to customize
- Add, edit, or reorder content blocks
- Save your layout changes
- Return to the theme editor to see the updates in the preview
For detailed instructions on using the Layout Builder, see the “Customizing your Brand Layouts” documentation.
Available Content Blocks
You can add various content blocks to your brand pages through the Layout Builder:
- Header Block – Brand logo and name display
- Hero Block – Large hero image or slideshow
- Custom HTML – Custom HTML content with Liquid support
- CTA Banner – Call-to-action section with image
- Product Showcase – Display featured products from the brand
- Category Grid – Display product categories in a visual grid
- Social Links – Social media profile links with icons
Brand Page Settings in Theme Editor
Preview Selection
- In the left sidebar, you may see a “Preview” section
- This allows you to preview how different brands will look
- Select a brand from the dropdown to see its page layout
- Use the “Change” button to switch between different brands for preview
- This helps you see how your layout works for different brands
Managing App Settings
- In the right sidebar settings, you’ll find a “Manage app” link
- Clicking this takes you directly to the Brand Pages app
- From there you can:
- Create or edit brands
- Use the Layout Builder to customize content
- Manage brand settings and status
- Upload brand logos and cover photos
Setting Up Brand Information
Before the single brand page displays properly, ensure you have set up the brand information:
Required Brand Information
- Go to Brand Pages app → Brand Pages list
- Create or edit a brand
- Fill in the essential information:
- Brand Name (required)
- URL Slug (for the page URL)
- Description (appears on the brand page)
- Brand Logo (recommended)
- Cover Photo (optional but recommended)
- Set Status to “Active”
- Save the brand
Linking Products to Brands
For products to appear on brand pages, they must be linked to the brand:
- Go to Brand Pages app → Product Integration
- Or assign brands via product metafields
- Link products to their respective brands
- Products will then appear in Product Showcase blocks on brand pages
For detailed instructions, see the “Linking Products to Brands” documentation.
Configuring Product Display
Using Product Showcase Blocks
- In the Layout Builder, add a “Product Showcase” block
- Configure the block to display products from the brand
- Choose layout options (grid or slider)
- Set filtering options if needed
- Products linked to the brand will automatically appear
Using Product Curated Blocks
- Product curated blocks allow you to manually select which products appear
- Add a “Product Curated” block in the Layout Builder
- Select specific products to feature on the brand page
- This gives you more control over which products are highlighted
SEO Configuration
Configure SEO settings for better search engine visibility:
- Go to Brand Pages app → Edit the brand
- In the SEO Settings section, configure:
- SEO Title – Custom page title for search engines
- SEO Description – Meta description for search results
- Save your changes
- These settings help your brand pages rank better in search results
Previewing Your Brand Page
- In the theme editor, use the preview area to see how your brand page looks
- Switch between different brands using the preview selector
- Check how content blocks are displayed
- Verify that products appear correctly
- Test on different view modes (desktop, tablet, mobile) using the view mode icons
Saving Your Configuration
- After configuring your brand page settings, review everything in the preview
- Make any final adjustments
- Click the “Save” button in the top right corner of the theme editor
- Your brand page configuration will be saved and published
- Brand pages will now be accessible at their configured URLs
Accessing Brand Pages
Once configured, brand pages are accessible at:
- /pages/brands/[brand-url-slug]
- Example: /pages/brands/ana-sousa
The URL slug is set when creating or editing a brand in the Brand Pages app.
Removing the Brand Page Block
- If you need to remove the Brand Page block from a page:
- Select the “Brand Page” block in the left sidebar
- Scroll to the bottom of the right sidebar settings panel
- Click the “Remove block” button
- Confirm the removal
- The brand page block will be removed from that page
Best Practices
- Always upload a high-quality brand logo
- Write compelling brand descriptions that tell your brand’s story
- Use the Layout Builder to create engaging, unique layouts for each brand
- Ensure products are properly linked to brands
- Configure SEO settings for better discoverability
- Use hero blocks or cover photos for visual impact
- Test brand pages on mobile devices
- Keep brand information up to date
- Use custom HTML blocks for unique brand experiences
Troubleshooting
Brand Page Not Displaying
- Verify the brand exists and is set to “Active” status
- Check that the Brand Page block is added to your theme
- Ensure the URL slug is correctly configured
- Try accessing the page directly via its URL
Content Blocks Not Showing
- Verify you’ve added blocks in the Layout Builder for that brand
- Check that blocks are saved in the Layout Builder
- Refresh the theme editor preview
- Ensure you’re previewing the correct brand
Products Not Appearing
- Verify products are linked to the brand via metafields or Product Integration
- Check that products are published and available
- Ensure a Product Showcase or Product Curated block is added in the Layout Builder
- Check for any filters that might exclude products
Logo or Images Not Displaying
- Verify images are uploaded in the brand settings
- Check that image file formats are supported (SVG, PNG, JPG)
- Ensure image files are not corrupted
- Try re-uploading the images