This guide will walk you through linking your products to brands so they appear on brand-specific pages and can be filtered by brand.
Why Link Products to Brands?
Linking products to brands allows you to:
- Automatically include products on their respective brand pages
- Enable brand-specific product showcases and filters
- Improve product organization and discoverability
- Create curated brand experiences for your customers
Method 1: Using the Product Integration Page
Accessing Product Integration
- Log into your Shopify admin dashboard
- In the left sidebar, locate the “Brand Pages” section
- Click on “Brand Pages” to expand the section
- Click on “Product Integration”
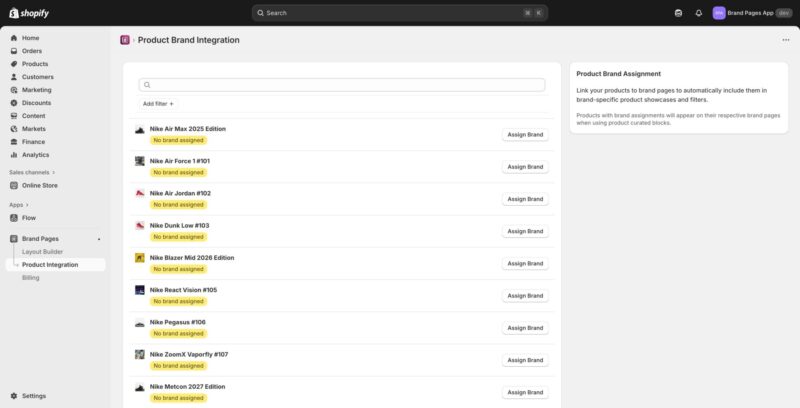
Viewing Products Without Brand Assignments
- On the Product Brand Integration page, you’ll see a list of all products
- Products without brand assignments will show a yellow “No brand assigned” label
- Each product row displays:
- Product thumbnail image
- Product name
- Brand assignment status
- An “Assign Brand” button on the right
Searching and Filtering Products
- Use the search bar at the top to find specific products by name
- Click “Add filter +” to add additional filters for more precise product selection
- Filters can help you find products by vendor, collection, or other criteria
Assigning a Brand to a Single Product
- Find the product you want to assign a brand to in the list
- Click the “Assign Brand” button on the right side of that product row
- A dropdown menu will appear showing available brands
- Select the appropriate brand from the list
- The brand assignment will be saved automatically
- The “No brand assigned” label will be replaced with the brand name
Method 2: Assigning Brands via Product Metafields
Accessing Product Metafields
- From your Shopify admin, go to “Products” in the left sidebar
- Click on the product you want to edit
- Scroll down to the “Product metafields” section
- If you don’t see this section, click on the “Product metafields” tab
Selecting a Brand from Metafields
- In the Product metafields section, locate the “Brand” field
- You’ll see it labeled as “Metaobject” type
- Click the “Select entry” button next to the Brand field
- A dropdown menu will open with a search bar at the top
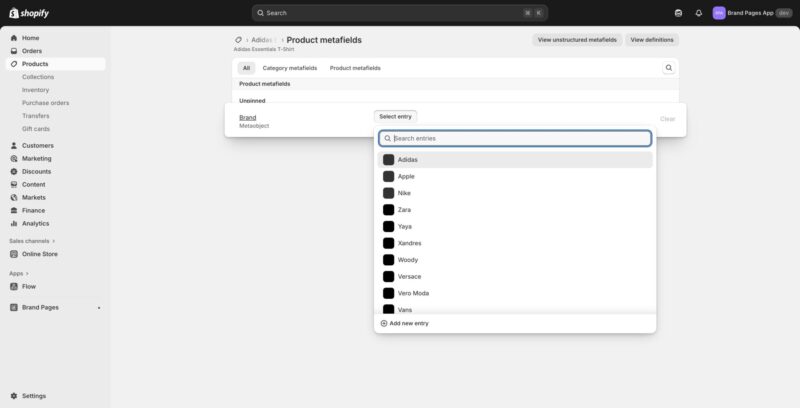
Searching and Selecting a Brand
- In the dropdown, you can use the search bar labeled “Search entries” to find a specific brand
- Type the brand name in the search field to filter the list
- Browse through the list of available brands (each shows a small icon)
- Click on the brand you want to assign to the product
- The dropdown will close and the selected brand will appear in the Brand field
- If you need to create a new brand, click “+ Add new entry” at the bottom of the dropdown
Saving the Product
- After selecting a brand, scroll to the top of the product page
- Click the “Save” button to save your changes
- The brand assignment will now be linked to the product
Method 3: Bulk Assignment via Product Edit Page
Editing Multiple Products
- From your Shopify admin, go to “Products”
- Select multiple products by checking the boxes next to them
- Click “Edit products” or use the bulk actions menu
- You’ll see a page titled “Editing [X] products” where X is the number of selected products
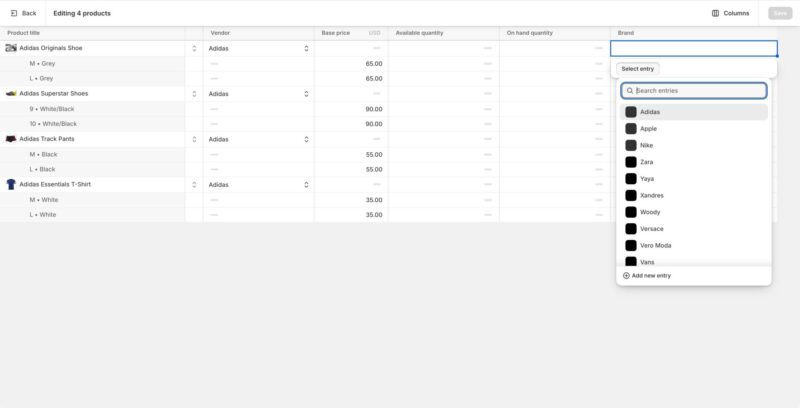
Assigning Brands in Bulk
- In the product table, locate the “Brand” column
- Click on the Brand dropdown for the product you want to assign
- A searchable dropdown will appear with all available brands
- You can search for brands using the “Search entries” field
- Select the appropriate brand from the list
- Repeat this process for each product in the table
- You can assign the same brand to multiple products by selecting it for each one
Saving Bulk Changes
- After assigning brands to all desired products, click the “Save” button in the top right
- All brand assignments will be saved at once
- This is an efficient way to assign brands to multiple products quickly
Verifying Brand Assignments
- Return to the Product Integration page in Brand Pages
- Products with brand assignments will no longer show the “No brand assigned” label
- You can search for products by brand name to verify assignments
- Products will now appear on their respective brand pages automatically
Removing Brand Assignments
- To remove a brand assignment, go to the product’s metafields section
- Click on the Brand field
- Clear the selected brand or leave it empty
- Save the product
- The product will no longer be associated with that brand
Best Practices
- Assign brands consistently – ensure all products from a brand are properly linked
- Use the Product Integration page to quickly identify products without brand assignments
- Use bulk editing when assigning the same brand to multiple products
- Verify assignments by checking that products appear on their brand pages
- Keep brand assignments up to date when adding new products
Troubleshooting
Products Not Appearing on Brand Pages
- Verify the brand assignment is saved correctly in product metafields
- Check that the brand page status is set to “Active”
- Ensure the product is published and available
- Check if there are any filters on the brand page that might exclude the product
Brand Not Showing in Dropdown
- Make sure the brand exists in the Brand Pages app
- Check that the brand status is set to “Active”
- Try refreshing the page or clearing your browser cache