This guide will walk you through creating and editing brand pages in the Brand Pages app.
Accessing the Brand Pages Section
- Log into your Shopify admin dashboard
- In the left sidebar, locate the “Brand Pages” section (it appears under “Apps”)
- Click on “Brand Pages” to expand the section
- You will see options for “Layout Builder”, “Product Integration”, and “Billing”
Creating a New Brand Page
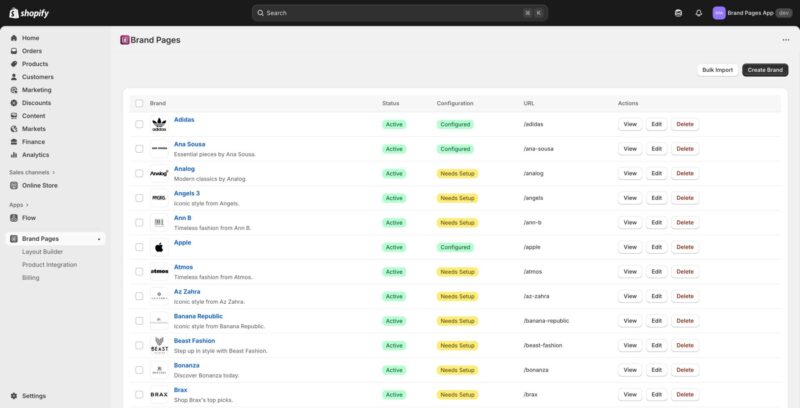
- From the Brand Pages list, click the “Create Brand” button in the top right corner
- You will be taken to the “Edit Brand” page
Editing an Existing Brand Page
- From the Brand Pages list, find the brand you want to edit
- Click the “Edit” button in the Actions column for that brand
- You will be taken to the “Edit Brand” page
Filling Out Brand Information
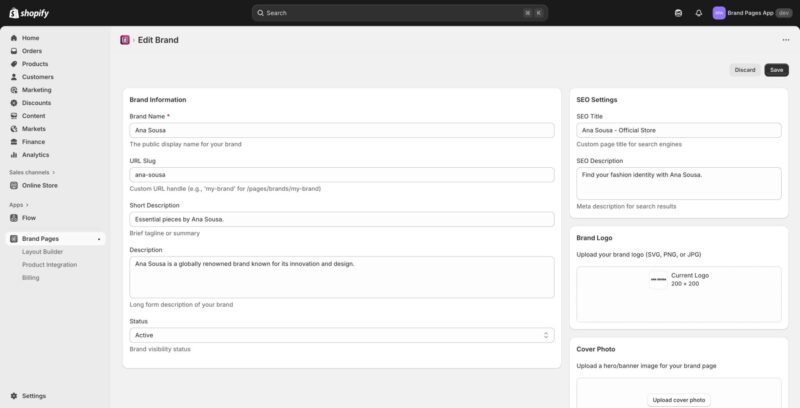
Brand Information (Left Column)
Brand Name (Required)
- In the “Brand Name” field, enter the public display name for your brand
- This is the name that will appear on your brand page
- Example: “Ana Sousa”
URL Slug
- The URL slug is automatically generated from the brand name, but you can customize it
- This determines the URL path for your brand page (e.g., “ana-sousa” creates the path /pages/brands/ana-sousa)
- Use lowercase letters, numbers, and hyphens only
- Keep it short and descriptive
Short Description
- Enter a brief tagline or summary for your brand
- This appears in brand listings and search results
- Example: “Essential pieces by Ana Sousa.”
Description
- Enter a longer, detailed description of your brand
- This is the main content that appears on your brand page
- You can include multiple paragraphs and detailed information
- Example: “Ana Sousa is a globally renowned brand known for its innovation and design.”
Status
- Use the Status dropdown to control brand visibility
- Select “Active” to make the brand page visible to customers
- Select “Inactive” to hide the brand page temporarily
SEO Settings (Right Column)
SEO Title
- Enter a custom page title for search engines
- This appears in browser tabs and search engine results
- Keep it under 60 characters for optimal display
- Example: “Ana Sousa – Official Store”
SEO Description
- Enter a meta description for search results
- This appears below the title in search engine results
- Keep it between 120-160 characters
- Make it compelling to encourage clicks
- Example: “Find your fashion identity with Ana Sousa.”
Brand Logo
- In the “Brand Logo” section, click to upload your brand logo
- Supported formats: SVG, PNG, or JPG
- Recommended size: 200 x 200 pixels or larger (square format works best)
- The logo will be displayed on your brand page and in brand listings
- If you already have a logo uploaded, you’ll see “Current Logo” with the existing image
Cover Photo
- In the “Cover Photo” section, click “Upload cover photo”
- Upload a hero or banner image for your brand page
- This image appears at the top of your brand page
- Recommended dimensions: 1920 x 600 pixels or similar wide format
- Use high-quality images that represent your brand
Saving Your Changes
- Review all the information you’ve entered
- Click the “Save” button in the top right corner of the page
- Your brand page will be saved and updated
- If you want to cancel your changes, click “Discard” instead
Viewing Your Brand Page
- After saving, you can view your brand page by clicking “View” from the Brand Pages list
- The brand page will be accessible at the URL: /pages/brands/[your-url-slug]
- Make sure the brand status is set to “Active” for it to be visible to customers
Deleting a Brand Page
- From the Brand Pages list, find the brand you want to delete
- Click the “Delete” button in the Actions column
- Confirm the deletion when prompted
- Note: This action cannot be undone
Bulk Import Brands
- From the Brand Pages list, click the “Bulk Import” button in the top right
- Follow the import wizard to upload a CSV file with brand information
- Ensure your CSV file matches the required format
- Review the imported brands and make any necessary adjustments